Asana Integration with Thunai
Overview
With Thunai, you can seamlessly integrate chat, voice, and email agents with Asana to manage projects, create tickets, and access enhanced features using the agents.
Use Cases
- Use chat, voice, and email agents to interact with Asana projects.
- Create and manage tickets within Asana directly through Thunai.
- Leverage agent features to streamline project workflows and communication.
Step 1: Login Into Thunai & Connect Asana
- Open the Thunai application.
- Click on Asana from the integrations menu.
- Click the Connect button next to Asana to start the connection process.
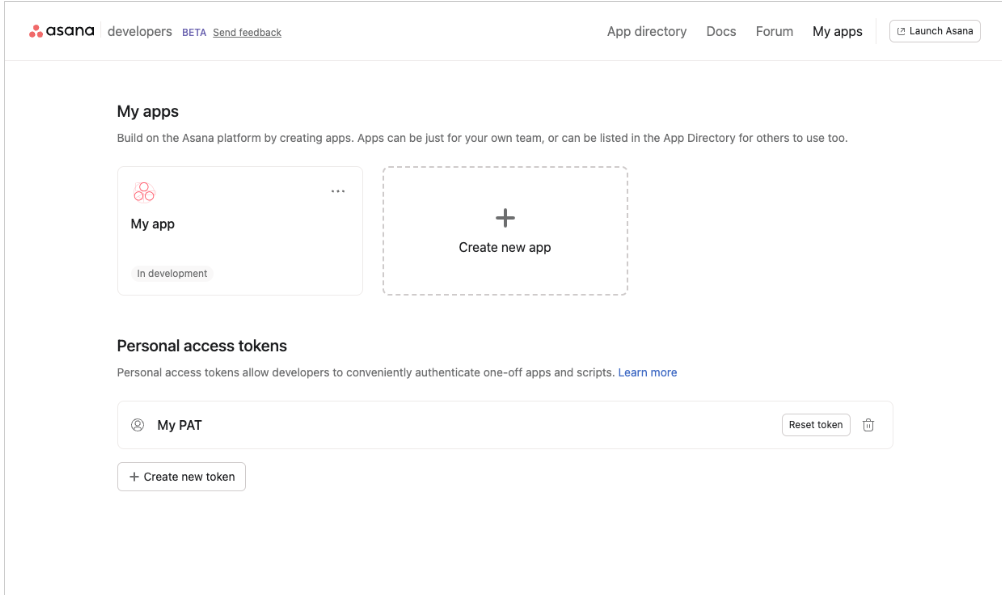
Step 2: Retrieve Your Asana API Key
- Log in to your Asana developer account at https://app.asana.com/0/my-apps.
- Click Create New Token.
- Enter an app name for identification (e.g., “Thunai Integration”).
- Click Create Token and then Copy API Key.
- Paste this API Key into the API Key field in Thunai (from Step 1).
Step 3: Configure Thunai with Asana
- In the Thunai form that appears after pasting the API Key:
- Select the Workspace associated with your Asana account.
- Select the Project you want to connect.
- Click Configure to complete the setup.

Integration with Agents
Asana can be integrated with Chat, Voice, and Email Agents to enable seamless task management. This integration allows users to create, update, and track tasks directly from agents without needing to access Asana manually.
Supported Agents & Features
1. Chat Agents
- Create New Tasks – Raise new tasks instantly from the chat interface.
- Link to Similar Tasks – Detect and connect to existing similar tasks.
- Check Task Details – View task status, priority, and other attributes directly.
- Update Task Details – Edit existing task information from chat.
- Custom Fields Support – Map custom fields. After setting the issue type and field mapping, agents will collect additional inputs during task creation.
- Authorization (Optional) – Add OTP verification or other methods before users can create or check tasks.
2. Voice Agents
- Create New Tasks – Raise tasks using voice commands.
- Link to Similar Tasks – Link new issues with existing ones when matched.
- Check Task Details – Get task status, priority, and details via voice interaction.
- Update Task Details – Modify task attributes using voice inputs.
- Custom Fields Support – Collect mapped custom field values through voice prompts.
- Authorization (Optional) – Secure task operations using OTP or voice authentication.
3. Email Agents
- Create New Tasks – Generate tasks through email instructions.
- Link to Similar Tasks – Automatically match and link similar tasks.
- Check Task Details – Retrieve task details via email response.
- Update Task Details – Update task information by sending structured emails.
- Custom Fields Support – Collect additional data from emails using mapped custom fields.
- Authorization (Optional) – Enable OTP or email-based verification for secure task access.
Configuration
- Create & Configure Common Agents
- Define and set up Chat, Voice, or Email agents as per your requirement.
👉 Learn how to create & configure agents
- Set Workflow & Map with Asana
- Configure workflow rules and automation based on your needs.
- Map workflows with the Asana application to enable seamless task handling.
👉 Learn more about workflows here
Once configured, users can manage Asana tasks end-to-end via Chat, Voice, or Email agents, ensuring faster collaboration and task handling.